Showing posts with label Dogs. Show all posts

Hey Diddle Diddle Remix--Video!

You may have read about my Hey Diddle Diddle set before--I wrote about it here.  But I didn't have a video using the set until right this very minute :)  So...here it is!  Classic Nursery Rhyme fun--but with a twist!  

Let's get all mixed up (click the picture to watch the video!) 


Hey Diddle Diddle Video!

Finally got around to making a video of this Hey Diddle Diddle set!  


You can check out my original post about this set right here.


Dogs!

Well, it's definitely not the dog days of summer right now, but these guys are too cute not to share :)  These were a custom request to go along with a dog story the customer had written, but check out some ideas below on how to use these cute pups!


Naturally, I have to make a Little Mouse version out of these.  A simple clipart flea or bone can be printed out and laminated.  Attach a dot of velcro to the back, and you're all set!
Little Flea
Little flea, little flea,
Playing Hide and Seek,
Are you under the pit bull/retriever/chihuahua/etc?
Let's take a peek!

Six Friendly Dogs
One friendly dog with not much to do,
Along comes another dog and that makes two.
Two playful dogs, barking up a tree,
Along comes another dog and that makes three.
Three tired dogs, asleep on the floor,
Along comes another dog and that makes four.
Four barking dogs waiting for a friend to arrive,
Finally she comes along and that makes five.
Five loyal dogs, run to catch some sticks,
Along comes the last one,
And that makes six.


You can find all sorts of flannel board goodness at the Flannel Friday Pinterest Boards!

Open-Ended Art

I loved so many things about being a preschool teacher that it's hard to come up with favorites.  But one of my most-loved areas of the classroom was definitely the art area.  Always busy and usually messy, this area of the room was full of so much creativity, conversation, and discoveries!  It took me many years to get my space and ideas organized in just the right way so that children could work independently, have access to varied, high-quality materials and tools, and engage in experiences that were interesting to the many little personalities in a group of 2, 3 and 4 year olds.

Communicating the 'why' of our open-ended art to the families was another issue.  There are crafts, and then there is creative art exploration (people call it process art now.)  My preference is creative exploration, but that's not always what parents know or understand.  I liked to get it all out in the open from the beginning of the year so anyone expecting cut out snowmen or construction paper apple trees would understand why instead they were receiving globs of yarn glued to a stick, one stripe of paint on an easel paper, or an envelope full of tiny cut up scraps!

Here's the letter I sent out each year to my three year old class.  I hope you find something useful in it!
------------------------------------------------------------------------------------------------ 
                                               Our Art Program

The art program in our classroom is Developmentally Appropriate and child-centered.  This means that we provide materials, and the children are able to use them in unique and creative ways, at their own pace.  It means that your child may sometimes come home with artwork, and sometimes come home with nothing, because it will be his or her choice to work with art materials or not.  It means that we focus on the process of art, rather than the product.  It means that what your child does at one of our art areas may be completely different than what another child does with the exact same materials.  Additionally, because we know how important it is for children to repeat activities, you may see the same art activities coming home day after day. Children learn by doing and through repetition, so we make every attempt to provide repeated experiences. 

When your child does artwork, and other work in our classroom, we use objective language when we talk to them about that work.  We will be sending home and posting (on the Good Information section of our bulletin board) a note with some examples of the kinds of words we use with them, but basically, we “Say What We See.”  By using objective language, we help children form concepts, develop vocabularies, and grow in self-awareness.  

We have three art spaces in our classroom, which are all grouped near each other and the sink.  They are the easel, the open art table and the round art table.

The easel:  We provide an easel in the classroom because different visual perception and eye-hand coordination skills are developed when painting here, versus painting on a flat surface.  The easel is open every day, and we do not limit the children as to how often or how long they paint here.  When we provide different consistencies of paint, various scented paints, scraps of different weights and textures, contrasting colors, shades and tints, and complementary colors, the children become aware of and attuned to these qualities and properties.   

The Open Art Table:  The long rectangular table is our Open Art Table.  This table is also open every day.  The shelves contain open-ended materials that are easy for the children to use independently.  We provide paper, scissors, crayons, stickers, glue and collage materials.  As the year goes on, we add baskets of lids and tubes and small boxes, along with masking tape, string, and ribbon.  This is where your child might create things that look like “junk” to you ;-).  Again, it is the process, and not the product that is important.  As your child tries to cut a piece of paper or use masking tape, important fine muscles are developing.  As she makes choices about what colors of paper or crayons to use, she is making color discriminations and planning in advance.  As children work here, they might also experience problem solving, decision making, inventing, and imagining, and they develop an awareness of linear patterns, color contrasts, spatial relationships, cause and effect, texture, proportion, etc.!

Round Art Table:
Our third area is the round art table.  This is where the teachers will introduce a new material or activity for the children to explore.  It may involve many of the things that the open art table will eventually contain.  This is where children can paint on a horizontal surface.  Sometimes we want to expose the children to an activity that requires a little more adult supervision, so we present it at this smaller table.  With our emergent curriculum, we may link an art activity to an interest we see happening in the classroom (for instance if someone is extremely interested in cars or other vehicles, we may invite them to paint with the wheels of cars; if someone is always playing with the animals, we may introduce painting with the feet of the toy animals;  if balls are a constant toy in use on the playground, we might experiment with painting with various sizes of balls…) Sometimes we may simply introduce a fun, messy activity that we hope the children enjoy.  In all cases, the end product is not what is important.  Rather, the process that each child becomes involved in is what holds the most meaning…

--------------------------------------------------------------------------------------------------


Old MacDonald

This set, like my Hickory Dickory Dock and One, Two, Buckle My Shoe sets is from a Judy Sierra pattern e-book.  I actually didn't already have an Old MacDonald set--though I do often use my farm finger puppets when we sing it.  I also have a pop-up Old McD book.  But it will be nice to finally have a simple felt set to use with this classic little song. 

You can find lots of my sets in my shop-come take a look!

Flannel Friday is being hosted this week by Lisa at Libraryland.  For more FF fun and information, please visit the blogFacebook page, or Pinterest page.  And share these links with your co-librarians or co-teachers. The more we share, the better!

Old Mother Hubbard

This is another nursery rhyme using a pattern from Judy Sierra.  So, so simple.  I'm happy I'm building up a supply of simple sets to use with my younger kids...


These guys aren't currently for sale at my shop but many of my other sets are!

Flannel Friday is being hosted this week by Amy at Catch the Possibilities, and you can find so many other flannel board ideas on Facebook, Pinterest, and the Flannel Friday blog!

Bark George

Sadly, I can't claim this amazing set as my own.  I don't actually know who made it--one of my past co-workers (Rebekah?  Sarah?) left it a few years ago, and she was clearly a talented lady!  I work with a lot of graduate students, and usually they take a class in which they have to make a flannel board story. I think this was the result of that course.  I'm so happy to have this set, because I actually don't care for Jules Feiffer's illustrations, especially in Bark George.  These pieces are  more appealing to me, and I use this set rather than the book--because the kids do love the story.

I will take credit for adding the black felt background for more stability, and I also used black fabric paint to make the lines drawn on the animals stand out more.  I decided not to do that with the vet, because I was afraid I'd end up ruining him.  He's pretty awesome :)

This particular set isn't for sale, but please check out my shop with many of my other sets:

Flannel Board Fun Shop


The Flannel Friday Roundup is being hosted this week by Laura at Library Lalaland!                    You'll also find other Flannel Friday goodies at Pinterest, Facebook, and the FF blog--check them out!

Move Over, Rover!

This was another new story for me.  I checked it out from the library (probably after seeing it suggested on one of the blogs listed on the right), and then checked Pinterest for a flannel board version.  Of course there was one-- Here's Rachel's version, complete with patterns! 

Felt Board Move Over Rover

Felt Board Raccoon

I just noticed I forgot to put Rover's name on his doghouse...  I also noticed cat hair and random fuzz on that raccoon photo that I couldn't see until I enlarged the picture.  Age is getting my mind and my eyes!

Dear Zoo

Ah, Storytime Katie how you inspire me!  Though I didn't follow all of Katie's techniques, I was determined to make those cages and zoo critters after seeing what a wonderful job she did.  I used sheets of black sticker felt and cut them into strips using an exacto knife and this ruler.  I used a hole punch to make the black circles, and a rectangular hole punch to make the smaller lock parts on the camel's cage.  Fabric paint for smaller dots and animal eyes...

When I know I'm going to layer pieces on the board, I tend to make only the bottom layers using the collage method. I really love the way the black background looks using that method, but the pieces are a lot stiffer and thicker, so they don't stick as well to each other and can topple right off the board mid-story.  So with Dear Zoo, for example, I used the collage method for the animals, but just did plain, un-backed felt for the cages so they would layer easily and not fall off the animals.


This particular set isn't for sale, but please check out my shop with many of my other sets:


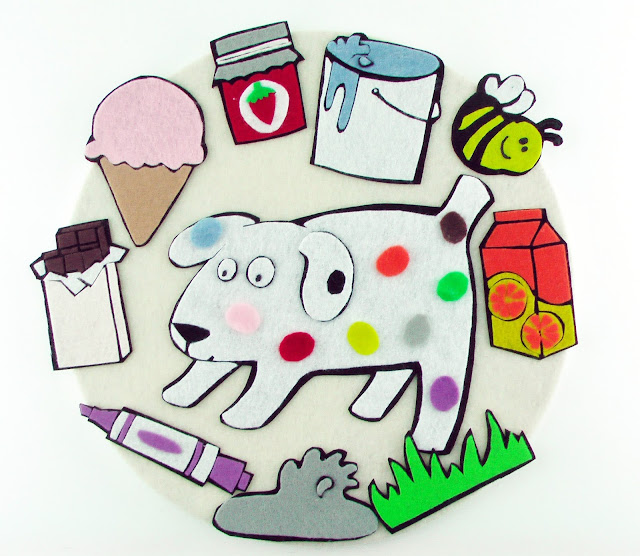
Dog's Colorful Day

Everyone seems to make this one, so I figured I would too!  I used clip art for all the "accessories" that color dog throughout his day...  Got the pattern for Dog right here.
This particular set isn't for sale, but please check out my shop with many of my other sets:

Flannel Board Fun Shop