

*Flannel Board Sets for Preschool Teachers and Storytime Librarians*
Showing posts with label Sensory. Show all posts
Showing posts with label Sensory. Show all posts
Sensory Table Basics
It just makes sense to have a sensory table in your classroom, home or library program. They're too beneficial and fun to skip! Click the picture below to read all about them :)

Ducks, ducks, ducks!
In my experience, preschool kids dig ducks. And anytime a preschooler likes something, they’re bound to learn a lot as they play with that thing. So let’s give them lots of duck stuff to do! Preschool duck activities galore, right here for your viewing pleasure…
Click below to keep reading:


Click below to keep reading:
Play dough--the details!
Soft and squishy, bright and colorful--what's not to love about play dough? Upon entering my classroom, it was one of the first things the children were greeted with each day, and was one of the most popular spots in the room.

As I mentioned in another post on play dough, I changed the color of the dough every two weeks, and swapped out a selection of open-ended gadgets and gizmos at the same time. By that time the dough was becoming a bit too crumbly, the toys needed a good soak and scrub, and the scent I'd added had probably faded quite a lot.
So what about those colors and scents? When I first started out as a teacher, I was lucky enough to get the best recipe ever for play dough from a co-teacher. I used the same recipe for 25 years (sometimes I'd make a double batch and freeze half to use at another time--it freezes perfectly!) But it wasn't until I'd been teaching for a few years that I discovered the joys of Liquid Water Color (beautiful, vibrant colors that you just can't get with food coloring), and the added sensory benefits of scenting the dough.
So here's everything I know and love about a good batch of play dough--enjoy!
The Only Play Dough Recipe You'll Ever Need
With a whisk or spoon, stir the following together in a medium pot:
2 cups all purpose flour
1/2 cup salt
2 Tbs. cream of tartar
Add and stir with a whisk or spoon:
2 cups water
2 Tbs. vegetable oil
As much liquid water color as you need to get the desired color
Whatever scent you've chosen (Some ideas are listed below)
Once you've whisked/stirred until there are no more lumps (a minute or two), turn the heat on to medium high. Stir with a wooden spoon constantly, until the dough begins to form a ball (a few minutes). It can still be a bit wet and mushy in spots when you dump it out of the pot onto the counter. Let it cool for a few minutes, and fill that pot with water right away for easier cleaning! Once the dough is cool enough to handle, knead it/mush it all together, combining any wettish spots with the more cooked parts. Soon you'll have a gorgeous lump of brightly colored, beautifully scented dough. You can store it in any airtight container (I usually used a zip top bag or Tupperware-type container.)
Smells and COLORS!
(Make sure there aren't any allergies or sensitivities in your class before you add scents to your dough)
Extracts--from the baking aisle in the grocery store--these go on sale periodically, so stock up!
Peppermint (great with red, green, pink or uncolored dough)
Lemon (yellow--or purple!)
Vanilla (uncolored, brown, black, blue--any color, really!)
Coconut (yellow, tan, turquoise--think beachy colors...)
Almond (uncolored, brown)
Lime (green!)
Orange (orange!)
Kool Aid
You can use Kool Aid to color and scent your dough--but it makes it a little sticky, and in humid weather it can go bad (aka moldy!) quickly, so beware!
Spices
Cinnamon (I love this with red or brown dough)
Pumpkin Spice (orange or brown...at Thanksgiving)
Italian Seasoning (uncolored, so you can see all the flecks!)
Cocoa Powder
I love to use this to make chocolate scented dough, and it adds a lovely smoothness to the dough, too. Throw several tablespoons in with the other dry ingredients. Add lots of black and brown food coloring for a deep chocolate look...
Hopefully you love play dough as much as I do, and use it daily in your classroom. And if not, you've got no excuses now! Get going!

Do you have a favorite recipe? A color and scent combo you couldn't live without? Post in the comments below!

As I mentioned in another post on play dough, I changed the color of the dough every two weeks, and swapped out a selection of open-ended gadgets and gizmos at the same time. By that time the dough was becoming a bit too crumbly, the toys needed a good soak and scrub, and the scent I'd added had probably faded quite a lot.
So what about those colors and scents? When I first started out as a teacher, I was lucky enough to get the best recipe ever for play dough from a co-teacher. I used the same recipe for 25 years (sometimes I'd make a double batch and freeze half to use at another time--it freezes perfectly!) But it wasn't until I'd been teaching for a few years that I discovered the joys of Liquid Water Color (beautiful, vibrant colors that you just can't get with food coloring), and the added sensory benefits of scenting the dough.
So here's everything I know and love about a good batch of play dough--enjoy!
The Only Play Dough Recipe You'll Ever Need
With a whisk or spoon, stir the following together in a medium pot:
2 cups all purpose flour
1/2 cup salt
2 Tbs. cream of tartar
Add and stir with a whisk or spoon:
2 cups water
2 Tbs. vegetable oil
As much liquid water color as you need to get the desired color
Whatever scent you've chosen (Some ideas are listed below)
Once you've whisked/stirred until there are no more lumps (a minute or two), turn the heat on to medium high. Stir with a wooden spoon constantly, until the dough begins to form a ball (a few minutes). It can still be a bit wet and mushy in spots when you dump it out of the pot onto the counter. Let it cool for a few minutes, and fill that pot with water right away for easier cleaning! Once the dough is cool enough to handle, knead it/mush it all together, combining any wettish spots with the more cooked parts. Soon you'll have a gorgeous lump of brightly colored, beautifully scented dough. You can store it in any airtight container (I usually used a zip top bag or Tupperware-type container.)
Smells and COLORS!
(Make sure there aren't any allergies or sensitivities in your class before you add scents to your dough)
Extracts--from the baking aisle in the grocery store--these go on sale periodically, so stock up!
Peppermint (great with red, green, pink or uncolored dough)
Lemon (yellow--or purple!)
Vanilla (uncolored, brown, black, blue--any color, really!)
Coconut (yellow, tan, turquoise--think beachy colors...)
Almond (uncolored, brown)
Lime (green!)
Orange (orange!)
Kool Aid
You can use Kool Aid to color and scent your dough--but it makes it a little sticky, and in humid weather it can go bad (aka moldy!) quickly, so beware!
Spices
Cinnamon (I love this with red or brown dough)
Pumpkin Spice (orange or brown...at Thanksgiving)
Italian Seasoning (uncolored, so you can see all the flecks!)
Cocoa Powder
I love to use this to make chocolate scented dough, and it adds a lovely smoothness to the dough, too. Throw several tablespoons in with the other dry ingredients. Add lots of black and brown food coloring for a deep chocolate look...
Hopefully you love play dough as much as I do, and use it daily in your classroom. And if not, you've got no excuses now! Get going!
Do you have a favorite recipe? A color and scent combo you couldn't live without? Post in the comments below!
Sensory Table Fillers
I see a lot of pins on Pinterest with sensory table ideas--there are tons of great ideas out there! But it can be difficult and expensive to switch out the filler very often (which is why I would often make smaller, special sensory trays to use in addition to the big table. That's for another post!)
In my classroom, I had three main fillers that I kept in the table for extended periods of time. These were tried and true materials that children can pour, scoop, pile and otherwise manipulate to their heart's content. They are food items, which is a sticky point for many, as children shouldn't be playing with food, and it's wasteful to use food as a toy. However, I stored my fillers in large cat litter tubs, and they kept for several years with no problem. Most of these can be bought in bulk at stores like Cosco, and asking each parent to bring in one bag or box of the filler to get you started is a great way to go about this, too.
First up: cornmeal. With grits added to cut down on the dust. I love how soft and quiet this is.

Next is my personal favorite: lentils and split peas. The feel of these is so soothing. They sometimes get stuck in a funnel--what a great problem solving moment!

Finally, rice. This is a common filler--some people even call their table the 'rice table' because that's all they've ever used in it!

I certainly supplemented with other fillers, but mainly I used these and rotated the tools instead. So easy to give the tools a dunk in a bucket of hot soapy water, and put in a new batch of tools for a new experience.
A tip for those times you do switch your fillers: put your storage tub in the middle of the table and use a large dustpan reserved for this purpose to scoop as much of the filler into the tub as you can. Then you only need to lift the mostly empty table to pour the last few bits into the tub.
Want more ideas of tools and fillers to use in your sensory table?

Share your favorite sensory table fillers in the comments below!
Bubble Wrap Painting
I. Love. Bubble. Wrap. It started when I was a kid, and my parents would let me pop the bubbles when a package arrived in the mail. There is something so satisfying about that activity--and I've brought bubble wrap into my classroom for the kids to pop lots of times. We've pinched it, poked it, stomped on it, and spread out long strips on the playground to run on (SO fun!)
But painting on bubble wrap is a whole different cookie :) There's no popping involved, but the process is equally satisfying in a completely different way. There's something so...cool? fun? sensory?...about rubbing a paint brush over those bumpy sheets of bubbles! Thick brushes, thin brushes, small bubbles or big--it's all just great fun!


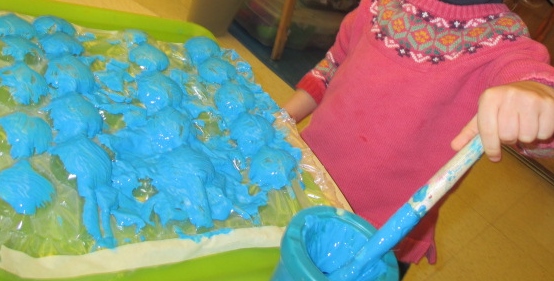
Painting on the bubble wrap can be the beginning, middle and end of this activity--or you can make prints too! Just show the kids how to place a piece of paper on top of their painted bubbles, rub it lightly, and peel it off. Bubbles! Yay!

Have you painted on bubble wrap with your children? Do they love it? Do they just want to pop those bubbles? I'd love to know your ideas--leave a comment!
Water Table Alphabet Soup!
I've found over the years that most children are interested in pretending to cook and eat. The Dramatic Play area of my room was fully stocked with play dishes, toy food, and empty food containers. But carrying that theme into the water table is a super fun variation!


The addition of alphabet letters adds a touch of early literacy to this activity. Letter naming and recognition for one! The kids might be interested in finding the letters in their name--if they're ready and interested, challenge them to find the first letter of the name of each family member! Math can happen, too, as you count letters with them, ask them to find all the red or blue letters, categorize by curved or straight line letters...
To create an Alphabet Soup water table, all you need are the following:
Plastic alphabet letters
Bowls
Spoons
Mini ladles if you can find them!
Empty spice containers
Cheap white shoelaces, cut into 10" or smaller pieces
Fill your table with water, sprinkle in ingredients, and watch the creative play in front of your very eyes!
Want more fun tidbits for teachers, parents, or anyone that loves small kids?

What's your favorite thing to put in the water table? Have you tried this recipe? Post in the comments below!
Sensory Tables!
Sensory tables used to be something found only in a preschool classroom, but lots of people have them at home now, too. I LOVE sensory tables, and if you don't have one I recommend them highly. You can buy an inexpensive under the bed storage container, attach it to a table temporarily using loops of duct tape, or just set it on the floor on top of a bed sheet or shower curtain (to catch the spills and dribbles :) Here are some of the benefits of playing in one:

You can make the experience even more valuable by interacting with the kids as they play in these tables. Ask them how many scoops it takes to fill a certain container, or ask them to pass you the biggest spoon, or the smallest cup—in these way you can enhance their thinking skills, their math skills, and their language skills all at once!
Need ideas for your sensory table? I've collected about a million right here. Want stuff more toddler-focused? Check these ideas out.
- As they share space and take turns with materials, children are learning to play cooperatively with others.
- As they explore lentils, cornmeal, dirt, rice, pasta, and water, they can observe those materials to see how they compare and contrast.
- Problem-solving skills are developed as the children try to fit lids on containers they have over-filled, or as they try to keep a collection of items from floating away in the table of water.
- Their fine motor skills grow as they use tongs to scoop up shredded cellophane, or use tiny spoons to scoop cornmeal into small film canisters.
- Eye-hand coordination grows as they pour water into a tube… The skills are as endless as the fun!

Need ideas for your sensory table? I've collected about a million right here. Want stuff more toddler-focused? Check these ideas out.
Alphabet Sensory Tray
Here's an idea I used to do in the classroom when I was a preschool teacher.
Maybe it will work for you too!
Although I always had a regular sensory table in my classroom, with the older kids (3 and up) I liked to have sensory trays on a table as well. These were set up for individual play. I put two trays on the table across from each other, with a beach towel underneath to catch spills. Here's an example. The filler is dyed tiny alphabet pasta, and we put lots of little containers, spoons, etc in for the kids to explore. Love the touch of early literacy with the ABC pasta--the kids loved hunting for the letters in their names...

We usually colored the pasta as a small group activity but you could skip the kids' participation and just do it all yourself :) We gave each child a small zip lock bag and had them use a small scoop to put some of the pasta in the bag. Then we used liquid watercolor from Discount School Supply--the kids chose which color they wanted to use. The teacher squirts a little into the bag and seals it, and then the kids shake, shake, shake. Add more color if needed. Shake some more. Dump all the bags out onto a tray and shake it so it's spread out a bit. Let dry. I'm not really sure how long it takes to dry--we always did this before snack time and often wouldn't get back to it till around 1 or 2. By that time it was totally dry. I imagine it probably takes about half an hour to be usable. Easy peasy mac and cheesey :) This lasts for years, by the way.

Subscribe to:
Posts (Atom)